
UITableViewについて
TableViewにおいていくつか気をつけておくと良いことがあります。
下記を参考に書いています。
Cellの表示更新を別のメソッドに分ける
tableView:cellForRowAtIndexPath: のdelegateメソッドでそれぞれのUITableViewCellを生成しますが、
このメソッド内で、Cell内容を更新する処理を直接書くのは避けましょう。
- (void)updateCell:(UITableViewCell *)cell atIndexPath:(NSIndexPath *)indexPath {
    // Update Cells
}
- (UITableViewCell *)tableView:(UITableView *)tableView
                     cellForRowAtIndexPath:(NSIndexPath *)indexPath {
    NSString *cellIdentifier = @"Cell";
    UITableViewCell *cell = [tableView dequeueReusableCellWithIdentifier:cellIdentifier];
    if (!cell){
        cell = [[UITableViewCell alloc] initWithStyle:UITableViewCellStyleDefault reuseIdentifier:cellIdentifier];
    }
    // Update Cell
    [self updateCell:cell atIndexPath:indexPath];

    return cell;
}
updateCell:atIndexPath: といったCellの更新を行うメソッドを用意し、
tableView:cellForRowAtIndexPath: からそのメソッドを呼び表示の更新を行う事で、表示更新処理を分離できます。
なぜ、このように表示更新処理を分離するかというと、
Cellの表示内容を変えようと思った場合に、 [self.tableView reloadData]; として、
tableView:cellForRowAtIndexPath: で全てのCellを生成し直すのはあまり効率的ではありません。
表示の更新だけを行うメソッドを用意しておけば、以下のように見えている部分だけの表示更新なども簡単に行う事ができます。
// 画面上に見えているセルの表示更新
- (void)updateVisibleCells {
    for (UITableViewCell *cell in [self.tableView visibleCells]){
        [self updateCell:cell atIndexPath:[self.tableView indexPathForCell:cell]];
    }
}
Cellに直接Viewを追加しない
Cellに対して addSubView: でUIButtonやLabelといったViewを追加する事ができるが、
UITableViewCellのインスタンスに直接ではなく、cell.contentViewに追加する。
Cellに対して直接追加した場合、編集モードなどにおいて適切な動作にならない事があるため、 Viewを追加するのはcell.contentViewの方にする。
UITableViewCell *cell = [[UITableViewCell alloc] init];
UILabel *label = [[UILabel alloc] init];
// Bad!!
[cell addSubview:label];
// Good!
[cell.contentView addSubview:label];
ControllerでCellにaddSubView:するのを避ける
可能ならば、Controller上で上記のようにaddSubview:等をしてCellをカスタマイズするのは避けたほうがよい。
最初の表示更新メソッドが利用しにくくなることや dequeueReusableCellWithIdentifier: によるセルのキャッシュも利用しくくなるため、
UITableViewCellのサブクラス(いわゆるカスタムセル)を作り、Cellの拡張したViewを作る方がよい。
Controller上で [cell.contentView addSubview:] した場合に起きる問題点としては、
そのcellが dequeueReusableCellWithIdentifier: により再利用され、再びaddSubview:が行われ、
cellに対して複数回Viewが追加されてしまう事が起こってしまう。
そのため、以下のような目に見える問題やメモリ効率的にもあまり良くない場合が多い。
- UITableViewのセルの値がスクロールするごとに重なったり壊れる現象 - hachinobuのメモ
- UITableViewでセル再描画時に文字が重ならないようにする « sabitori works
- UITableViewCell セルの再利用の問題 | DevCafeJp
この問題を解決するには、以下のような方法がある。
- キャッシュをしない(or identifierをCell毎に変える)
- addSubViewする前に、CellのsubViewを除去する
- CellのtextLabelやaccessoryView等のデフォルトのセルコンテンツで表示する
- カスタムセルを作って利用する
1と2は 上記のリンクのような方法であるが、 3と4のような手法を使い表示したほうが、コード的にも綺麗に書くことができ、バグも減ると思われる。
次は3と4の手法についてあたっていく
UITableViewCellデフォルトのセルコンテンツの利用
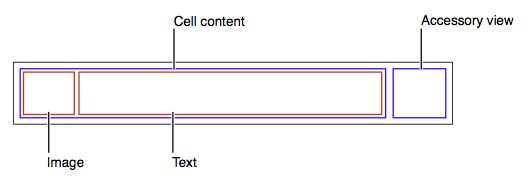
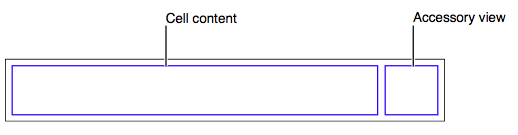
UITableViewCellデフォルトのセルコンテンツ
UITableViewCellオブジェクトにはデフォルトでセルコンテンツ用に次のプロパティが定義されています。
- textLabel — セル内のテキストのメインラベル(UILabelオブジェクト)
- detailTextLabel — セル内のテキストのサブラベル(UILabelオブジェクト)
- imageView - 画像を保持する画像ビュー(UIImageViewオブジェクト)
- accessoryView - アクセサリビュー(UIViewオブジェクト)
textLabelとdetailTextLabelの配置はUITableViewCellStyle(4種類)によって異なるので、下記を参考にして下さい。
accessoryViewは見落としがちですが、Cellの右側に任意のUIViewオブジェクト(UILabelやUIButtonもUIViewを継承してる)を配置できるので、 色々と使い道があります。
凝った表示を求めない場合は、これらのデフォルトセルコンテンツを使い解決出来る場合が多いため、 まずは、デフォルトセルコンテンツで解決できないかを考えてみるとよいです。
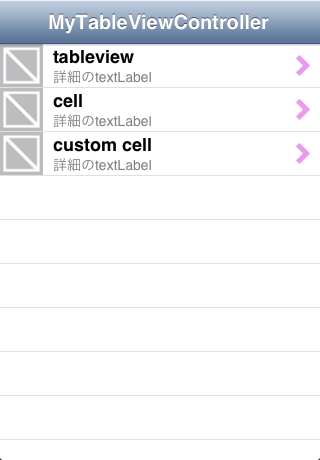
デフォルトのセルコンテンツを利用したサンプルはCodeのTableViewに入っています。
/Code/ios-practice/tableView/MyTableViewController.m
#import "MyTableViewController.h"

#define kCellIdentifier @"CellIdentifier"

@interface MyTableViewController ()

@property(nonatomic, retain, readwrite) NSArray *dataSource;

@end

@implementation MyTableViewController {
@private
    NSArray *_dataSource;
}

@synthesize dataSource = _dataSource;

- (id)initWithStyle:(UITableViewStyle)style {
    self = [super initWithStyle:style];
    if (!self){
        return nil;
    }
    return self;
}

#pragma mark - View lifecycle
- (void)viewWillAppear:(BOOL)animated {
    [super viewWillAppear:animated];
    // deselect cell
    [self.tableView deselectRowAtIndexPath:[self.tableView indexPathForSelectedRow] animated:YES];
    // update dataSource
    [self updateDataSource];
    // update visible cells
    [self updateVisibleCells];
}

- (void)updateDataSource {
    self.dataSource = [NSArray arrayWithObjects:@"tableview", @"cell", @"custom cell", nil];
}

#pragma mark - Cell Operation
- (void)updateVisibleCells {
    // 見えているセルの表示更新
    for (UITableViewCell *cell in [self.tableView visibleCells]){
        [self updateCell:cell atIndexPath:[self.tableView indexPathForCell:cell]];
    }
}

// Update Cells
- (void)updateCell:(UITableViewCell *)cell atIndexPath:(NSIndexPath *)indexPath {
    // imageView
    cell.imageView.image = [UIImage imageNamed:@"no_image.png"];
    // textLabel
    NSString *text = [self.dataSource objectAtIndex:(NSUInteger) indexPath.row];
    cell.textLabel.text = text;
    NSString *detailText = @"詳細のtextLabel";
    cell.detailTextLabel.text = detailText;
    // arrow accessoryView
    UIImage *arrowImage = [UIImage imageNamed:@"arrow.png"];
    cell.accessoryView = [[UIImageView alloc] initWithImage:arrowImage];
}
//--------------------------------------------------------------//
#pragma mark -- UITableViewDataSource --
//--------------------------------------------------------------//
- (NSInteger)tableView:(UITableView *)tableView
             numberOfRowsInSection:(NSInteger)section {
    return [self.dataSource count];
}

- (UITableViewCell *)tableView:(UITableView *)tableView
                     cellForRowAtIndexPath:(NSIndexPath *)indexPath {
    NSString *cellIdentifier = kCellIdentifier;
    UITableViewCell *cell = [tableView dequeueReusableCellWithIdentifier:cellIdentifier];
    if (!cell){
        cell = [[UITableViewCell alloc]
                                 initWithStyle:UITableViewCellStyleSubtitle reuseIdentifier:cellIdentifier];
    }
    // Configure the cell...
    cell.accessoryType = UITableViewCellAccessoryNone;
    [self updateCell:cell atIndexPath:indexPath];

    return cell;
}

//--------------------------------------------------------------//
#pragma mark -- UITableViewDelegate --
//--------------------------------------------------------------//

- (void)tableView:(UITableView *)tableView
        didSelectRowAtIndexPath:(NSIndexPath *)indexPath {

    // ハイライトを外す
    [tableView deselectRowAtIndexPath:indexPath animated:YES];
}
@end
上記のコードでは、デフォルトのセルコンテンツにそれぞれ指定をしています。
カスタムセルを利用する
利点としては見た目について扱うものが分離できるためコードが綺麗になる事や、 Interface Builderを使い見た目を決定できるため細かい調整が簡単になることがある。
カスタムセルの作り方は下記の記事を見るといい。
See also
- シンプルなカスタムセルの作り方とセル内のボタンへのイベント設定方法
- xibを使ったカスタムセルとセル内部のUIButtonのイベント設定方法について
- TableViewでDynamic PrototypesだけどStatic Cellsのように見た目をGUIで作成する方法 | Technology-Gym
- カスタムセルもUITableViewController上で作る方法を利用した例